UNBOXING
FIRST STEPS:
Unwrap your Farmshelf unit and remove your Starter Kit Items from the lower left panel door
Attach your Condensate Lid (see below for instructions)
Power on your unit
Connect to the internet
(Optional) Connect plumbing
Starter Kit Items
microfiber cleaning cloth
trimming shears
black caps
condensate lid (clear plastic lid)
nursery watering jug
cylinder
cleaning squeegee
power cord
Attach The Condensate Lid
Find the groove underneath your Farmshelf (image right), slide in the plastic lid making sure that the rubber tube is not sticking out of the tray, and snap it into place (you’ll hear a click). Skipping this step may result in minor leaks.
You will not need to empty this! The collected water will be recirculated back into your unit.
POWERING ON & CONNECTING TO THE INTERNET
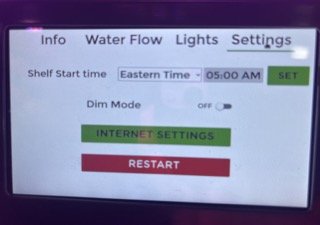
Once plugged in and powered on, your Farmshelf’s touchscreen will start up. Use the touch screen to navigate to ‘Settings’ then select ‘Internet Settings’.
Ethernet connection is also available. Connect a live ethernet cable to the ethernet port located on the back of the Farmshelf.
Note: You will receive an error if pairing pin is attempted without internet connection - even if correct.
Note: (Set) your time zone only after adding internet to your Farmshelf.
Seed Arrival + Pro-tips
Start your nursery right away! 2 weeks after delivery, the seedpods will lose viability.
Open your box right side up (like an egg carton) and on a flat surface.
Each plant has different speeds of germinating! While some crops start to sprout right away, others are generating roots and will take longer to sprout. Details for each crop can be found on the Farmshelf Crop Guide.
Nursery Nutrients (2 vials)
Adding Seedpods to THE Nursery
STEP 1
Move your seedpods from the delivery carton to the black trays. We suggest putting the black trays in the nursery for this step. You can pull the trays out about 3” to make reaching easier. The black cap with the water droplet icons should be facing outwards so the trays can be easily watered. (see below image)
Step 2
Add cold water to the blue nursery watering jug, filling about 3/4 of the way (to the highest indented line). If you’re able, we recommend you use filtered water.
Step 3
Carefully add the contents of the nutrient vials, one by one, into the watering jug, put the lid on the jug, and then agitate gently for 30 seconds.
Step 4
Remove the black cap from each nursery tray and fill each tray with about 1/3 of the water from the jug. All trays should be filled evenly until the jug is empty. Once filled, there will be a little bit of space still in each nursery tray - this is okay!
Step 5
Fill the nursery humidifier up 3/4 of the way with cold water then place the lid on.
STEP 6
Turn the nursery on via the Lights tabs of the touchscreen. Nursery lights will have periodic dark modes (do not turn on and off during 14 day nursery period)
NEXT STEPS
Check on your nursery tray water twice a week. If the water level is less than 50% full, add more water. The video on the right will walk you through how to check on your nursery.
On Day 14, the crops in your nursery will be ready to be moved up to the shelves. Transplant instructions can be found here.
Crop Cycle
Total Time in Farmshelf: 8-10 weeks (crop cycle)
2 Weeks in Nursery
Order new seeds week 6, to expect the delivery on week 7
Start your Nursery again on week 7/8
Final Harvest between week 8-10
For plants in Farmshelf at all times, this is the best timeline. Plants can live longer than 10 weeks, for bold flavor we encourage a renewal of your crop cycle.
Ready to move YOUR PLANTS to THE shelves?
Move your plants from the nursery to the upper shelves!


